DIY Cardboard Gingerbread House: Fun & Festive Holiday Crafting!
Could the spirit of holiday creativity be captured in something as simple as cardboard? The answer, undoubtedly, is a resounding yes. Cardboard gingerbread houses, far from being a mere substitute, offer a delightful, accessible, and eco-friendly alternative to their sugary counterparts.
The allure of crafting a gingerbread house, that quintessential symbol of festive cheer, often draws us in. Yet, the reality of sticky candies, tricky icing, and the potential for a kitchen disaster can be daunting. This is where the cardboard gingerbread house steps in, offering a solution that is as charming as it is practical.
The beauty of this DIY project lies not only in its ease but also in its potential for personalization. From the simple to the elaborate, cardboard gingerbread houses can be tailored to your vision. Consider the classic gingerbread look, with a peaked roof and square windows, or perhaps a barn-shaped design to add a touch of whimsy. These cardboard creations are a canvas for your imagination, ready to be transformed with paint, glitter, and whatever embellishments you desire. And the best part? Cleanup is a breeze!
| Feature | Details |
|---|---|
| Project Type | DIY Holiday Craft |
| Primary Material | Cardboard (Recycled Boxes Recommended) |
| Secondary Materials | Paint, Glue (White Glue, Shaving Cream "Frosting"), Decorations (Glitter, Felt Balls, Stickers, etc.) |
| Target Audience | Families, Children, Craft Enthusiasts |
| Skill Level | Beginner to Intermediate |
| Estimated Time | Varies depending on size and detail, generally a few hours to a day. |
| Cost | Low (Dependent on decorations) |
| Benefits | Creative outlet, Family activity, Eco-friendly, Easy cleanup, Customizable, Affordable |
| Variations | Size (Life-size playhouses to miniature decorations), Shape (Peaked roof, Barn shape, Gable roof), Decoration style (Classic gingerbread, Modern designs, Whimsical themes) |
| Tools | Scissors/Craft Knife, Ruler/Measuring Tape, Pencil, Paintbrushes |
The journey begins with the humble cardboard box. Start by gathering large cardboard boxes the bigger, the better, especially if you envision a life-size playhouse. For a smaller project, the side of a tissue box can serve as a handy template. Trace the side of the tissue box onto cardboard and cut out. Repeat to make a second piece. The front and back of the house will require a printed template. Print template, trace, and cut cardboard sides for the front and the back of the house. These will form the walls. Then, measure and cut a 5 by 8 piece of cardboard for the roof. Make sure the corrugation is in the direction of the fold for easier bending. The beauty of this project is its adaptability; you can tailor the size and shape to your specific needs and available materials.
With your cardboard pieces cut, the construction phase commences. Lay the back piece of the house on a flat surface. Glue the side pieces to the back, reinforcing the corners with additional pieces of cardboard if necessary. Attach the front of the house in the same way, ensuring the structure is stable. Gummed reinforcement tape is a valuable ally in this stage, providing extra durability and ensuring that your house can withstand the enthusiastic decorating efforts of the little ones. Consider the house's overall design before gluing the pieces together. If you envision a chimney, a porch, or other architectural elements, integrate those at this stage.
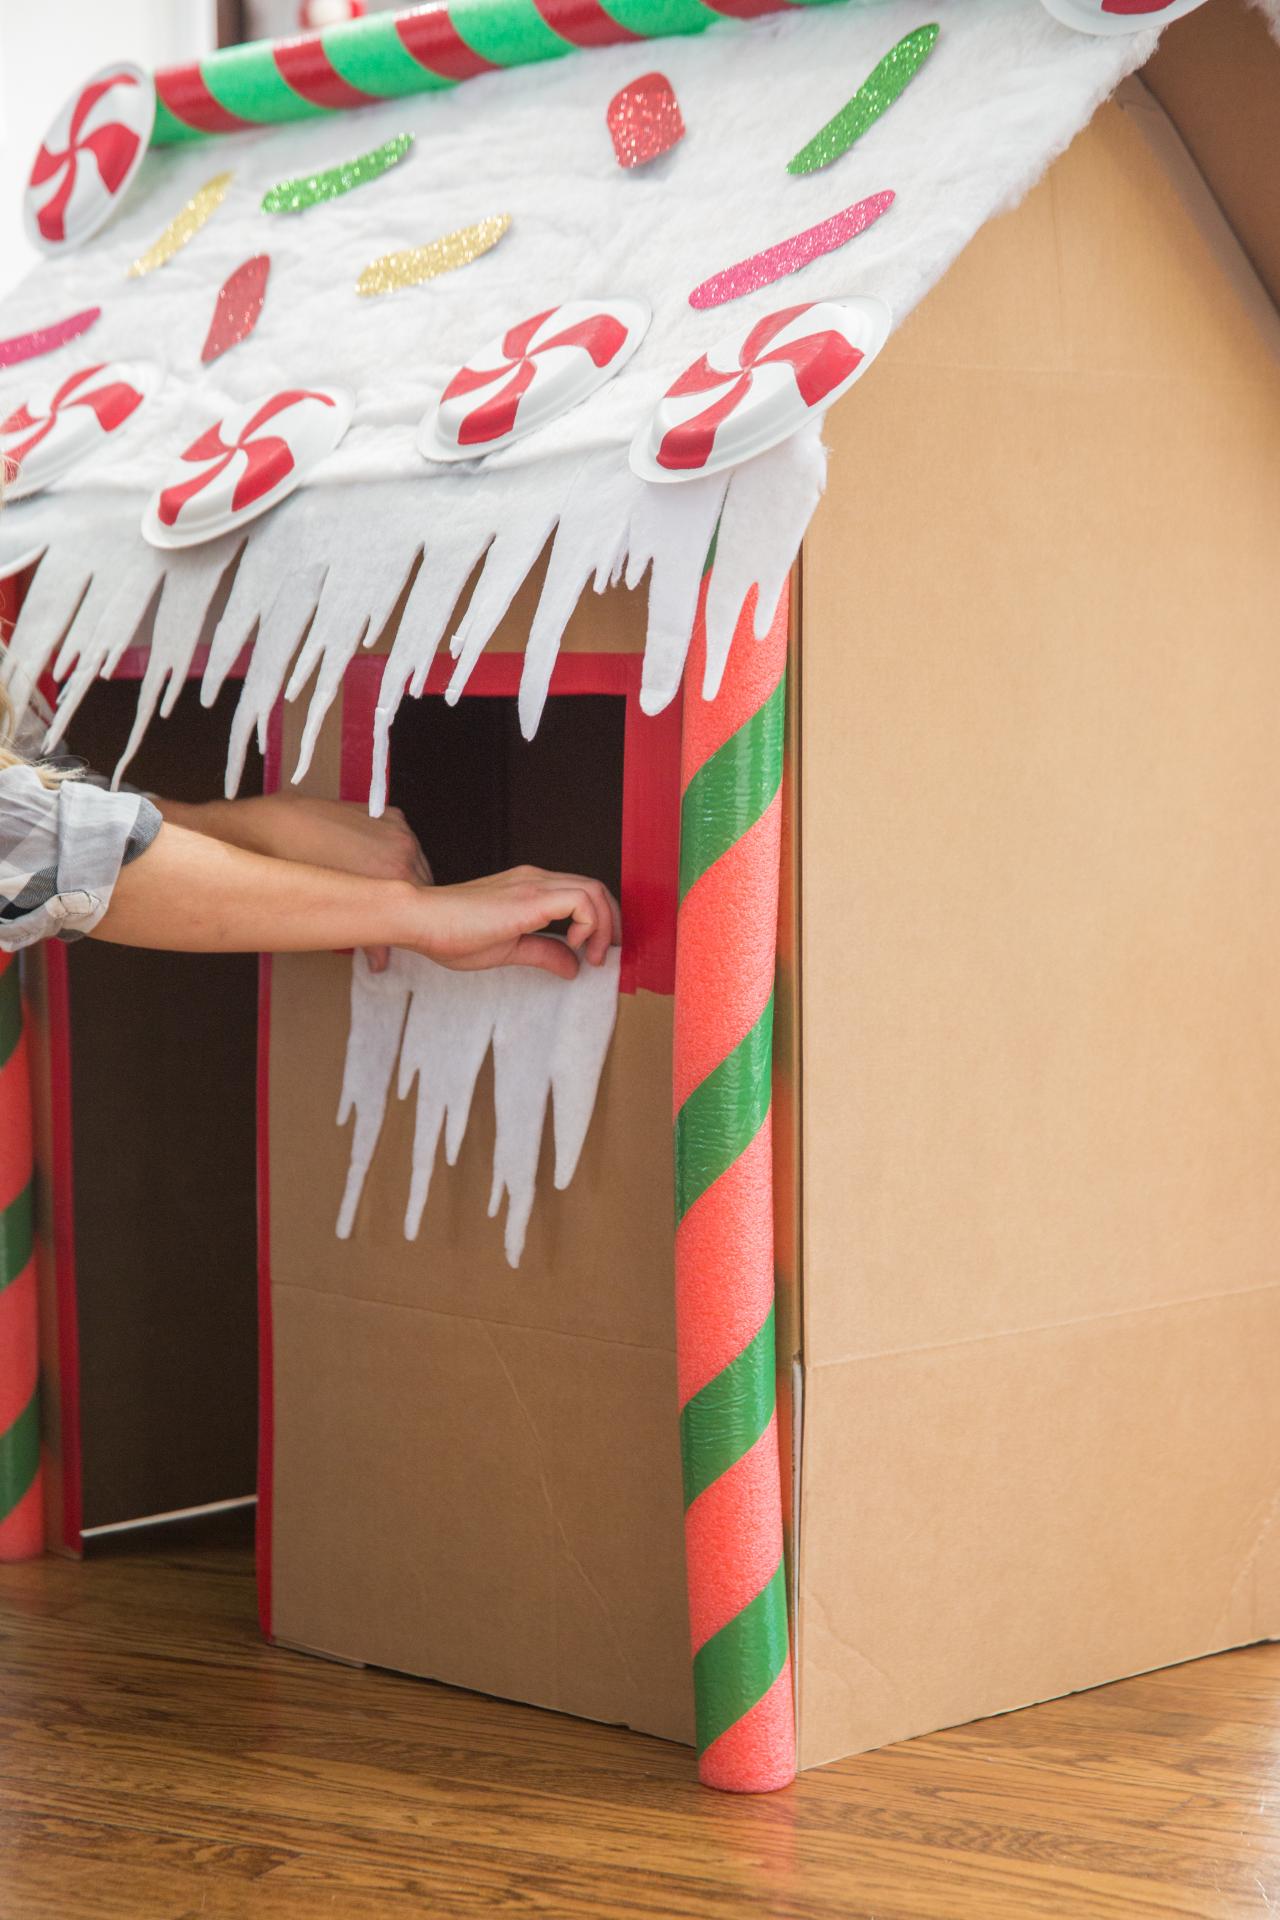
Now for the fun part: decoration! This is where your creativity truly shines. Paint is the primary medium for transforming plain cardboard into a festive gingerbread house. Choose your color palette classic gingerbread browns, or perhaps a more whimsical approach with bright colors. Shaving cream frosting can be a fun, safe, and easy alternative. Make your shaving cream 'frosting'. Consider adding "icing" decorations using paint, glitter, or felt balls. The possibilities are endless. You might want a small box if you want to add a fancy window box for flowers. Don't forget the details: tiny windows, doors, and perhaps a roaring stone fireplace painted on the inside for that extra touch of realism. My oldest was then 7 and really enjoyed helping paint the stones.
Once your house is assembled and decorated, it's time to consider additional embellishments. Felt balls, stickers, and even battery-operated light strings can enhance the festive atmosphere. This DIY project brings out your creativity and adds a personal touch to your holiday decorations. The order comes with 4 styles of gingerbread house kit, 4 packs of colorful clay, 8 stickers, 1 instruction manual, 42 pompoms, 8 chenille stems, 4 watercolor pens, 4 glitter glue, 4 packs of artificial snow, 1 pack of grass decoration, 1 pack of christmas sprinkles, 2 fake diamond stickers, 4 light strings, 8 bottles of white glue, 1 acrylic clay, providing ample materials for creating multiple houses. Consider adding a touch of "snow" using cotton balls or artificial snow. To start, youll need two large boxes big enough to crawl into. These tiny cardboard gingerbread houses light up and are a fun and easy DIY project this holiday season! They dont call me the cardboard whisperer for nothing. Save this DIY cardboard gingerbread village in your favorite Pinterest.
If you're crafting with children, remember to prioritize safety. Use non-toxic paints and glue. Supervise their activities, and let them participate in the process. This is the perfect afternoon activity to keep them occupied when its too cold to go outside and play. Best of all, cleanup is easy, and you wont end up with icing all over your hands (or your house). Involve the entire family and make it a shared activity to build precious memories. It was really easy, actually.
Making a cardboard gingerbread house is definitely more my style. They don't call me the "cardboard whisperer" for nothing. I absolutely love those big gingerbread houses! But theyre not always feasible time wise. There certainly is not as much sugar involved! This is just so, so cute. What we love about it is that you can recycle a cardboard box and make a fun playhouse with your kids, for your kids to enjoy over the Christmas break. Step into this cardboard gingerbread house. Obviously, a cozy cardboard gingerbread house isnt much without a roaring stone fireplace.
This approach offers a unique blend of creativity, sustainability, and family fun. Not only does it repurpose readily available materials, it also provides a canvas for imaginative expression and shared moments. The benefits of crafting cardboard gingerbread houses extend far beyond the finished product; it's a celebration of resourcefulness, creativity, and the joy of making something together. First, start with a large cardboard box, at least 40 tall, 30 wide, and 30 deep, so its big enough for kids to crawl inside. As i was making these adorable little cardboard gingerbread houses, i was thinking that i dont know if ive ever really talked about what i used to do for a job before this.
The first part to making a DIY cardboard gingerbread house is cutting the gingerbread house shape. Cut a rectangle shape and then trim the top corners to look like a house with a roof. Add details to the cardboard gingerbread house. To get started, youll first need to print out the gingerbread house template provided at the bottom of this article. Cut out gingerbread house shapes. I picked sections of cardboard that had the least amount of blemishes and traced out a house shape. There are so many different options from a peeked roof to gables to barn shaped.
The Christmas gingerbread house kit includes 8 DIY cardboard gingerbread houses, 200 felt balls (red, white, blue, green, yellow), 8 sets of 12 color watercolor pens and 2 rolls of tapes. The sufficient quantity and good combination are enough to meet your daily use and replacement needs. Glue your house pieces together ahead of time, so they would be sturdy when my kids were decorating. Alternatively, you can use the shaving cream glue to glue them together as you go. The ones that the kids can play inside and act out the story of the gingerbread man? Guide on DIY cardboard gingerbread house step 1. Start saving all those cardboard delivery boxes for an almost free DIY that is sure to add a touch of Christmas magic to your home. Plus, its the perfect way to style a mantel or credenza that is in need of a little help.
Whether you're seeking a festive activity for the family, a creative outlet for yourself, or a unique way to decorate for the holidays, the cardboard gingerbread house offers a delightful solution. It is a testament to the power of imagination, the potential of recycled materials, and the joy of creating something beautiful, one cardboard box at a time. Learn how to create a whimsical. While the classic gingerbread house is typically made of actual gingerbread, icing, and candies, i used a different approach and made mine from paper mache/cardboard gingerbread houses. Next, youre going to repeat the process for the 2nd half of the gingerbread house. Note that while you can include both halves of the gingerbread house on your design space canvas at the same time, and add the icing decorations to both halves all at once, the icing file is very large with lots of layers, as youve seen.


